In this article, we will write our first web automation test case using Java. While working on a project for test automation, you should require all the selenium dependencies. Usually, those dependencies will be downloaded manually throughout the project lifecycle. We will use maven as a project management tool and IntelliJ as an IDE. We will see why maven is important, later in this article. It is a bonus point if you are good in Java.
☑ Read the Previous Article: Introduction to Selenium – The Best Automation Tool
Before we start to write tests using maven, let’s begin by understanding the Maven.
Table of Contents
What is Maven
Apache Maven is a software project management tool, based on the concept of the Project Object Model (POM). Here are the basic features of Maven –
- It is a simple project setup that follows the best practices.
- Maven projects can be shared across all Maven projects.
- Easy to migrate for new Maven features.
- It provides support for managing the entire Java project lifecycle.
- Easy to define project structures, dependencies, builds, and test management.
- Provides a large and growing repository of libraries.
Project Object Model – POM
It is an XML file that contains the information of the project and configuration information such as dependencies, source directory, build directory, test source directory, goals, plugins, etc.
First Selenium Test Case using Java
Now we will start to write our first automation test script, but before that, we need to collect all the required tools.
Prerequisite for Selenium Automation
IDE – Any of your choice. Here we are using IntelliJ.
Project Management Tool – Maven
Programming Language – Java
Setup a new Maven Project in IntelliJ
✅ Read Article – How to create Maven Project in IntelliJ?
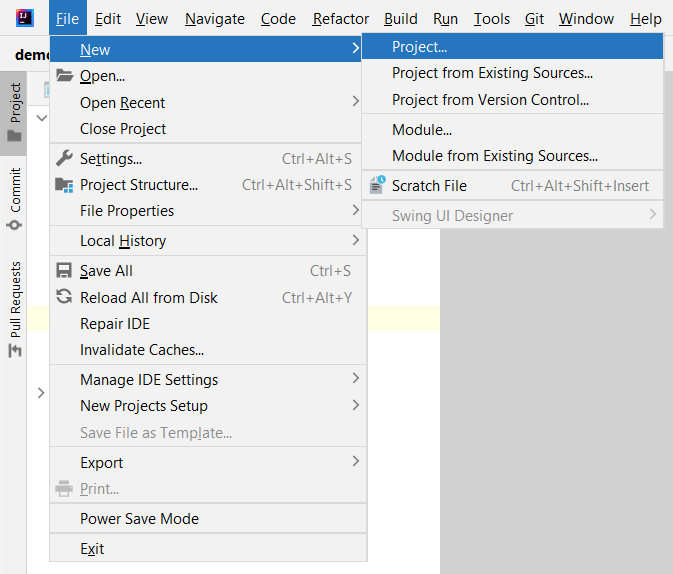
Step – 1: Navigate to File > New > Project.
Step – 2: Now In the New Project section, fill the details – Name, Preferred Location, Language as Java, Build System as Maven, and select JDK.
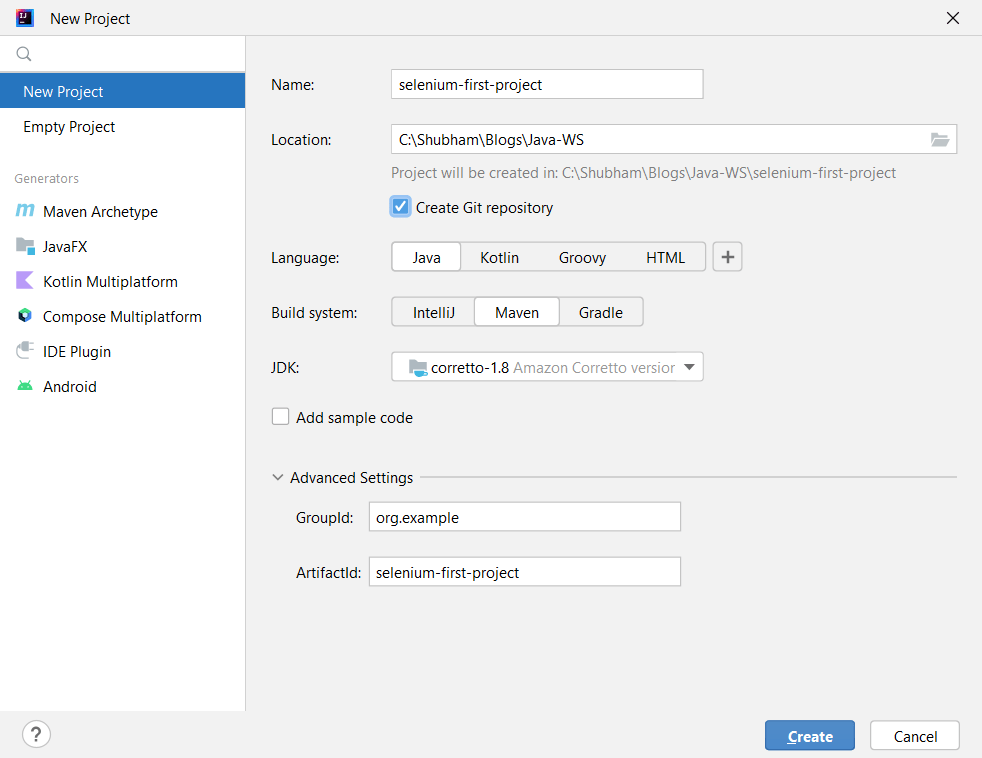
Under advanced Settings, you can write GroupId and ArtifactId. And then click Create.
Step – 3: After finishing, you can see the project structure in your IDE which is shown in the below screenshot.

Step – 4: Now open the pom.xml file and you can add the required dependencies under the <dependencies></dependencies> tag.
By default, pom.xml file looks like this –
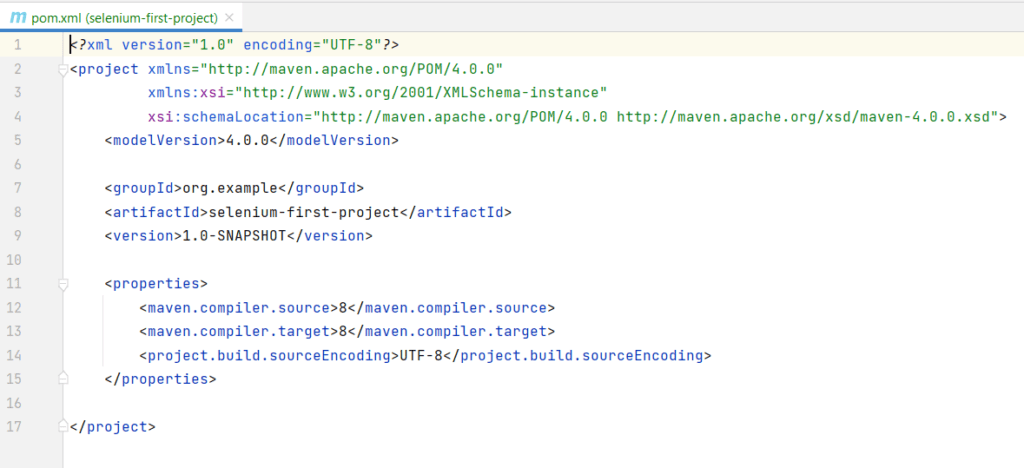
Step – 5: Adding dependencies for selenium. Copy and paste the below dependency after the properties closed tag.
<dependencies>
   <dependency>
       <groupId>org.seleniumhq.selenium</groupId>
       <artifactId>selenium-java</artifactId>
       <version>4.4.0</version>
   </dependency>
</dependencies>
Step – 6: After that, reload the maven project. And all the dependencies will be downloaded inside the External Libraries folder.
Step – 7: Create a java class in src/main/java – FirstTest.java
Write the Selenium Test Script
After configuring the maven project we need to write the selenium code. For that, there are certain steps to create scripts.
1 – Create a Web Driver Instance
To launch the website in any browser, we need to set the system properties of the path of the driver for the browser. We can use the specific driver for the specific browser.
For Firefox – Since it is the default browser for the selenium for testing. So we don’t need to set the path for this driver. The code for this will be –
WebDriver driver = new FirefoxDriver();For Chrome – We need to set the property for the driver path. You can download the chrome driver from here. And put the file in java/main/resources folder. The code will be –
System.setProperty("webdriver.chrome.driver", "path of the chrome driver");
WebDriver driver = new ChromeDriver();
2 – Navigate to URL
driver.get("https://www.saucedemo.com/");
3 – In the Username and Password fields, enter the details
To perform this step, we need to locate the Username and Password field and then fill the details using the selenium command.
Open the Inspect Elements of your chrome browser and locate those required fields. There are multiple elements locating strategies to locate web elements. We will discuss it all later.
Here we find the ID locator and are going to use the same. We can store them in a web Element variable and perform the required actions.
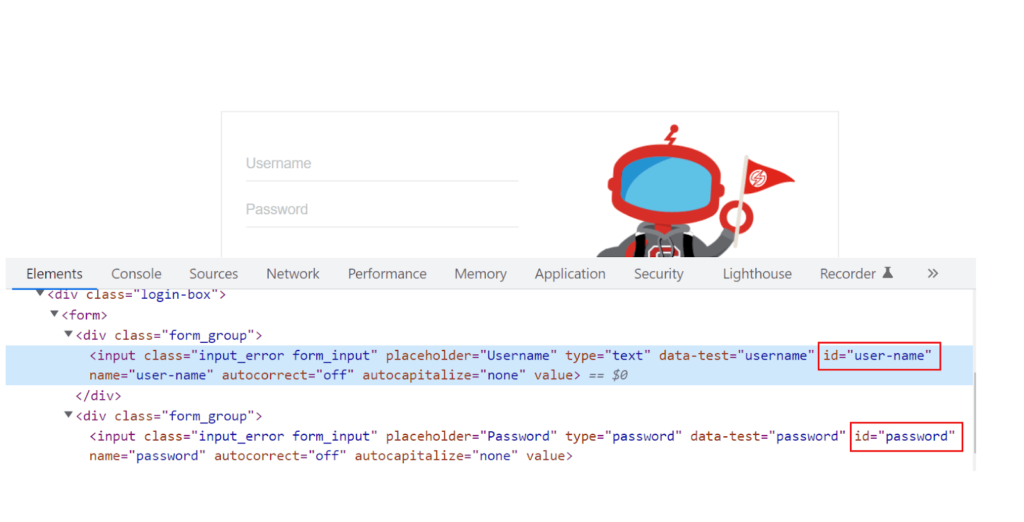
WebElement input_username = driver.findElement(By.id("user-name"));Once the element has been located, now we can perform the required action:
input_username.sendKeys("standard_user");Doing the same things for locating the password field and login button field and after locating, we will perform the required actions.
WebElement input_password = driver.findElement(By.id("password"));
input_password.sendKeys("secret_sauce");

WebElement button_login = driver.findElement(By.id("login-button"));
button_login.click();
4 – At the end, we can close the browser
It is good practice to close the web browser after completing the code otherwise the web driver session will not close properly. There are two ways to terminate the driver –
- close() – will close the browser which is currently in focus.
driver.close();- quit() – will close all the browser windows which are open.
driver.quit();5 – Your final code will be written like this –
import org.openqa.selenium.By;
import org.openqa.selenium.WebDriver;
import org.openqa.selenium.WebElement;
import org.openqa.selenium.chrome.ChromeDriver;

public class FirstTest {

    public static void main(String[] args) {

        // Create the WebDriver instance
        System.setProperty("webdriver.chrome.driver", "src/main/resources/chromedriver.exe");
        WebDriver driver = new ChromeDriver();

        // Navigate to website
        driver.get("https://www.saucedemo.com/");

        // Locating the username field and store into WebElement variable
        WebElement input_username = driver.findElement(By.id("user-name"));

        // Enter the username using sendKeys action.
        input_username.sendKeys("standard_user");

        // Locating the password field and store into WebElement variable
        WebElement input_password = driver.findElement(By.id("password"));

        // Enter the password using sendKeys action.
        input_password.sendKeys("secret_sauce");

        // Locating the login button and store into WebElement variable
        WebElement button_login = driver.findElement(By.id("login-button"));

        // Click the login button using click action.
        button_login.click();

        // Close the driver instance
        driver.close();
    }
}
6 – Run the Test case
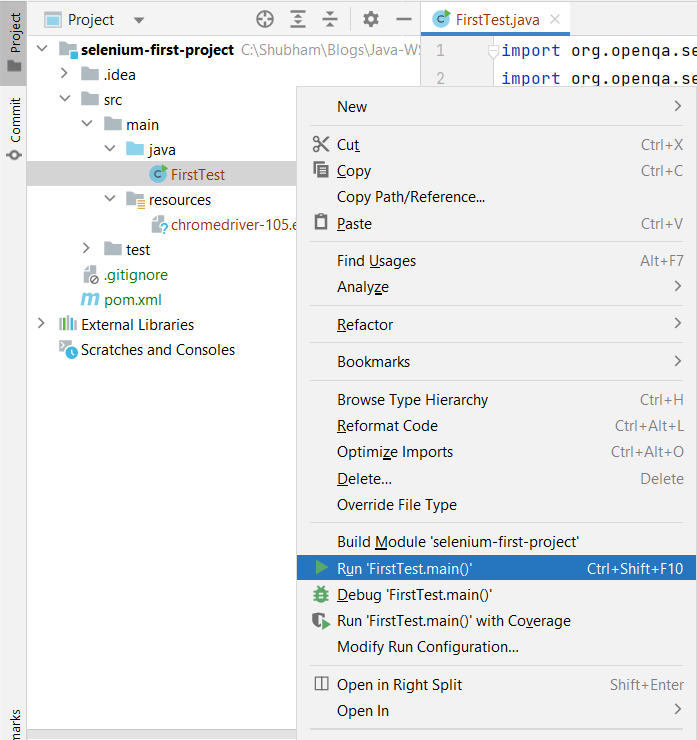
To run the test case do right-click on your Java file and click on run. It will start executing –
Conclusion
Bingo, So till here, we have successfully written the first Selenium Test Case and run. We have learned how to create an instance of drivers, selenium allows us to use any of the drivers, Just we need to download the driver of your browser version. We can create the same project using Gradle also. Now we will see more things in the next articles.
Resources
You might Like
💖 If you like this article please make sure to Like, Comment, and Share it with your friends and colleagues.
Follow us on our social networks –

