
In this article, you will learn about how to integrate Cucumber with your Selenium WebDriver and how to use the cucumber BDD approach for making a test automation framework. In the last article, you have seen how to write a selenium test case using TDD Test-driven development. First, we will see what is Cucumber, after that we will create step by step automation test.
Table of Contents
What is Cucumber?
A Cucumber is a tool that is based on BDD – Behavior Driven Development framework. It is used to write acceptance tests for the application. It is easily readable and understandable to Business Analysts, Developers, Stakeholders, and QA Team as It is purely written in the English language. In short, It explains the behavior of the application in simple English language using Gherkin.
Cucumber Feature File
The Cucumber Feature file is written in Gherkin language which is basically in English. Gherkin uses a set of special keywords. This file must save with a feature extension.
Gherkin Keywords
Feature – Provides a high-level description of an application.
Scenario – Represents a particular functionality of an application.
Scenario Outline – It is the same as the scenario but the same test will be performed with different data sets. With Scenario Outline you have to use the Example keyword for the data set.
Given – Describes the pre-conditions. It is a known state.
When – Describes an event, or an action.
Then – Describes an expected outcome, or result.
And – Describes the combination of two or more steps for the same type of action.
Background – Defines a step or series of steps that are common to all the test scenarios in the feature file.
Example – Describes the test data in a table format. It is used with Scenario Outline.
Examples of some Feature FIles
Example 1 – Sample feature file with basic keywords
Feature: Login To the Application

    Scenario: Login Functionality
        Given user launches the application login page
        When user enters the username as "shubham" and password as "P455w@rd"
        And user clicks on login button
        Then user should navigate to home page
Example 2 – Sample feature file with scenario outline
Feature: Login To the Application

    Scenario Outline: Login Functionality
        Given user launches the application login page
        When user enters the username as "shubham" and password as "P455w@rd"
        And user clicks on login button
        Then user should navigate to home page

    Examples:
        | username | password |
        | user1    | pass1    |
        | user2    | pass2    |
        | user3    | pass3    |
Example 3 – Sample feature file with background
Feature: Login To the Application

    Background:
        Given user launches the application login page
        When user enters the username as "shubham" and password as "P455w@rd"
        And user clicks on login button
        Then user should navigate to home page

    Scenario: Transfer money from one account to another
        Given user navigates to money transfer page
        When user enters the account no as "10000265465" and amount as "500"
        And click on transfer button
        Then enters the otp as "123456"
        And verify the successful message
        And logout the user

    Scenario: Check the recent transactions
        Given user navigates to transaction page
        When user applies the filter for transaction count as "5"
        And click on view button
        Then verifies all the transactions
        And logout the user
Selenium Test using Cucumber
Pre-Requisites
- Java Setup in your system
- Maven installed – Read the Maven Article
- Installed any IDE – We are using IntelliJ in this article.
The Cucumber BDD Framework
The Cucumber BDD framework majorly consists of three parts – Fearture Files, Step Definitions, and Test Runner File.
1. Feature File
In the Feature file, we write all cucumber tests, and these files are saved with the extension – ".feature". We have already gone through the feature file above.
2. Step Definitions
For the steps that are written in the feature files, we write the implementation. A Step Definition file mapped data between each step of a scenario of a feature file.
3. Test Runner File
To run the cucumber tests, we need a Test Runner File, which defines the step definitions and features locations, and other primary metadata using cucumber options.
The Test Runner File uses the @RunWith() Annotation from JUnit for executing tests. It also uses the @CucumberOptions Annotation to define the location of feature files, step definitions, reporting integrations, etc.
Setup a new Maven Project in IntelliJ
You can create the maven project in IntelliJ IDE while following the same steps as the previous article.
Adding required Dependency
Add the below dependency in pom.xml file for JUnit. And after that reload the maven project again.
<dependency>
    <groupId>junit</groupId>
    <artifactId>junit</artifactId>
    <version>4.11</version>
</dependency>

<dependency>
    <groupId>org.seleniumhq.selenium</groupId>
    <artifactId>selenium-java</artifactId>
    <version>4.7.2</version>
</dependency>

<dependency>
    <groupId>io.cucumber</groupId>
    <artifactId>cucumber-junit</artifactId>
    <version>7.0.0</version>
</dependency>

<dependency>
    <groupId>io.cucumber</groupId>
    <artifactId>cucumber-java</artifactId>
    <version>7.7.0</version>
</dependency>
Setup the Project Folder Structure
Step 1 – Create two packages for TestRunner and StepDefinitions under src/test/java folder – runner, and stepdefinitions.
Step 2 – Create a class TestRunner.java under src/test/java/runner package, and another class TestSteps.java inside the src/test/java/stepdefinitions.
Step 3 – Create a resources folder in src/test folder, and create features directory. Inside this directory, we will write all cucumber feature files.
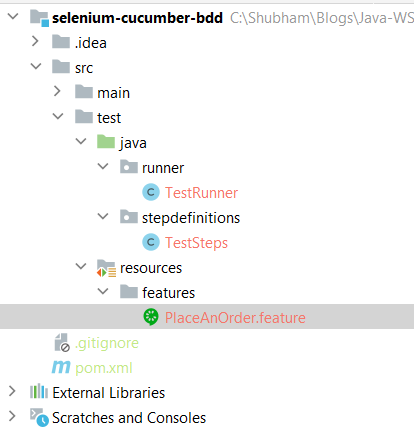
Create Feature File
We are adding our cucumber feature files inside src/test/resources/features. Now create a file PlaceAnOrder.feature file and write the following steps –
Feature: User place an order on saucelab application

  Scenario Outline: Successfully place an order
    Given User is on home page
    When User enters login credentials "<username>" and "<password>"
    And User clicks on "login" button
    Then User verifies the "product" page
    And User select a product "<productName>"
    And User verifies the product title on "product details" page
    And User clicks on "add to cart" button
    And User clicks on "go to cart" button
    And User verifies the "cart" page
    And User verifies the product title on "cart" page
    And User clicks on "checkout" button
    And User verifies the "checkout information" page
    And User enters checkout information "<firstname>" "<lastname>" and "<zipcode>"
    And User clicks on "continue" button
    And User verifies the "checkout overview" page
    And User verifies the product title on "checkout overview" page
    And User clicks on "finish" button
    And User verifies the "checkout complete" page
    And User verifies the success message on checkout complete page

    Examples:
      | username      | password     | productName              | firstname | lastname | zipcode |
      | standard_user | secret_sauce | Sauce Labs Fleece Jacket | shubham   | kumar    | 12345   |
Explanation
Line 4 – verifying the home page
Line 5 – entering the login credentials
Line 6 – clicking on the login button
Line 7, 12, 15, 18, 21 – verifying the page titles
Line 8 – selecting a product
Line 10, 11, 14, 17, 20 – clicking on the buttons for the next page or next operations
Line 16 – entering user information
Line 9, 13, 19 – verifying product title on the current page
Line 22 – verifying the success message on the checkout complete page.
Creating the Test Runner File
We have created a java file TestRunner inside the src/test/java/runner.
@RunWith() – annotation tells about the test runner class to start the execution of the tests.
@CucumberOptions – annotation is used to set cucumber properties like features, glue, plugins, and many more.
package runner;

import io.cucumber.junit.Cucumber;
import io.cucumber.junit.CucumberOptions;
import org.junit.runner.RunWith;

@RunWith(Cucumber.class)
@CucumberOptions(
        glue = {"stepdefinitions"},
        features = "src/test/resources/features"
)
public class TestRunner {
}
glue – is used to tell the path of the step definition files.
features – is used to tell the path of the feature files.
Generating the Scenario Steps for Step Definitions
Run the TestRunner file and you can see the missing steps on the console. You can copy and paste those all steps inside TestSteps class.

After adding the test steps inside TestSteps class, your file will look like this –
package stepdefinitions;

import io.cucumber.java.en.Given;
import io.cucumber.java.en.Then;
import io.cucumber.java.en.When;

public class TestSteps {

    @Given("User is on home page")
    public void user_is_on_home_page() {
    }

    @When("User enters login credentials {string} and {string}")
    public void user_enters_login_credentials_and(String string, String string2) {
    }

    @When("User clicks on {string} button")
    public void user_clicks_on_button(String string) {
    }

    @Then("User select a product {string}")
    public void user_select_a_product(String string) {
    }

    @Then("User verifies the product title on {string} page")
    public void user_verifies_the_product_title_on_page(String string) {
    }

    @Then("User verifies the {string} page")
    public void user_verifies_the_page(String string) {
    }

    @Then("User enters checkout information {string} {string} and {string}")
    public void user_enters_checkout_information_and(String string, String string2, String string3) {
    }

    @Then("User verifies the success message on checkout complete page")
    public void user_verifies_the_success_message_on_checkout_complete_page() {
    }

}
Now, we need to add the logic code for each step. We need to find locators and perform the actions on that. We can create a separate locator class, but in this article, we have not created any other separate class for locators.
package stepdefinitions;

import io.cucumber.java.en.Given;
import io.cucumber.java.en.Then;
import io.cucumber.java.en.When;
import org.openqa.selenium.By;
import org.openqa.selenium.WebDriver;
import org.openqa.selenium.WebElement;
import org.openqa.selenium.chrome.ChromeDriver;

import java.time.Duration;
import java.util.List;

import static org.junit.Assert.assertEquals;

public class TestSteps {

    WebDriver driver = null;
    static String expectedProductName = "";

    @Given("User is on home page")
    public void user_is_on_home_page() {
        driver = new ChromeDriver();
        driver.manage().window().maximize();
        driver.get("https://www.saucedemo.com");
        driver.manage().timeouts().implicitlyWait(Duration.ofSeconds(20));
        assertEquals("Swag Labs", driver.getTitle());
    }

    @When("User enters login credentials {string} and {string}")
    public void user_enters_login_credentials_and(String username, String password) {
        driver.findElement(By.id("user-name")).sendKeys(username);
        driver.findElement(By.id("password")).sendKeys(password);
    }

    @When("User clicks on {string} button")
    public void user_clicks_on_button(String button) {
        switch (button) {
            case "login":
                driver.findElement(By.id("login-button")).click();
                break;
            case "add to cart":
                driver.findElement(By.cssSelector("button[id^=add-to-cart]")).click();
                break;
            case "go to cart":
                driver.findElement(By.className("shopping_cart_link")).click();
                break;
            case "checkout":
                driver.findElement(By.id("checkout")).click();
                break;
            case "continue":
                driver.findElement(By.id("continue")).click();
                break;
            case "finish":
                driver.findElement(By.id("finish")).click();
                break;
        }
    }

    @Then("User verifies the {string} page")
    public void user_verifies_the_page(String page) {
        String actualTitle = driver.findElement(By.className("title")).getText();
        String expectedTitle = "";
        switch (page) {
            case "product":
                expectedTitle = "Products";
                break;
            case "cart":
                expectedTitle = "Your Cart";
                break;
            case "checkout information":
                expectedTitle = "Checkout: Your Information";
                break;
            case "checkout overview":
                expectedTitle = "Checkout: Overview";
                break;
            case "checkout complete":
                expectedTitle = "Checkout: Complete!";
                break;
        }
        assertEquals(expectedTitle.toUpperCase(), actualTitle);
    }

    @Then("User select a product {string}")
    public void user_select_a_product(String productName) {
        List<WebElement> products = driver.findElements(By.className("inventory_item_name"));
        for (WebElement product : products) {
            if (product.getText().equals(productName)) {
                product.click();
                break;
            }
        }
        expectedProductName = productName;
    }

    @Then("User verifies the product title on {string} page")
    public void user_verifies_the_product_title_on_page(String page) {
        String actaulProductTitle = "";
        if (page.equals("product details")) {
            actaulProductTitle =
                    driver.findElement(By.className("inventory_details_name")).getText();
        } else {
            actaulProductTitle = driver.findElement(By.className("inventory_item_name")).getText();
        }
        assertEquals(expectedProductName, actaulProductTitle);
    }

    @Then("User enters checkout information {string} {string} and {string}")
    public void user_enters_checkout_information_and(String fName, String lName, String zCode) {
        driver.findElement(By.id("first-name")).sendKeys(fName);
        driver.findElement(By.id("last-name")).sendKeys(lName);
        driver.findElement(By.id("postal-code")).sendKeys(zCode);
    }

    @Then("User verifies the success message on checkout complete page")
    public void user_verifies_the_success_message_on_checkout_complete_page() {
        String successMessage = driver.findElement(By.className("complete-header")).getText();
        assertEquals("THANK YOU FOR YOUR ORDER", successMessage);
        driver.close();
    }

}
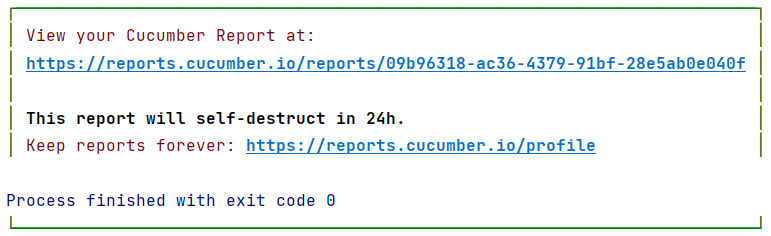
Now, run the TestRunner class and you can see the status report on the console.
Generate Cucumber Report
Cucumber provides its own report. For doing so you need to add Cucumber Options inside the TestRunner file.
@CucumberOptions(publish = true)Now, run the same TestRunner File again after adding the given cucumber option, you can see the report link in the console.

Generate Pretty Reports
We can use the Pretty plugin inside the cucumber options to generate the console report.
@CucumberOptions( plugin = { "pretty" } , monochrome = true)monochrome – used for making the console output more readable.

Conclusion
Cucumber is a very popular BDD tool. We can create all required test cases inside the feature file that is easy to understand by all stakeholders including tech and non-tech persons. Cucumber is very easy to integrate with Selenium. We can create feature files and can generate the steps and write the code according to each step.
Resources
- Source code with example
- Cucumber IO
You might Like
- Maven complete guide
- Locate Element in Selenium
- Actions Class in Selenium
- Selenium JUnit Integration
- Playwright Automation using JavaScript
💖 If you like this article please make sure to Like, Comment, and Share it with your friends and colleagues.
Follow us on our social networks –