🎉 Wishing you a very Happy New Year !!!
This new year, I am going to start with a new automation tool – Microsoft Playwright. In this article, we will learn about playwright testing. Playwright is the newest addition to the Headless Browser Testing Frameworks which is developed by the authors of Puppeteer and maintained by Microsoft. Playwright is an open-source web automation library, built on top of Puppeteer. In this article, we look into a web automation framework created with Playwright and Java Script.
Table of Contents
What is Playwright?
Microsoft Playwright is a newer, open-source, cross-browser end-to-end automation testing library initially developed by Microsoft contributors. It begins with a JavaScript-based library but now expanded its support to Python, Java, .NET, etc.
Playwright is an addition to the Test Automation Framework and has a similar syntax to Puppeteer, but it has overcome many limitations present in Puppeteer. Playwright writes powerful, stable automated tests. Playwright tests across all modern browsers like Chrome, Firefox, Safari, Microsoft Edge, and Opera Mini, and It is designed to be a framework that solves the needs of testing for today’s modern web apps.
Why Playwright?
So there are many popular web automation tools in the market. The common challenges are slowness of execution, unwanted waits, browsers setup scripts, etc. The playwright tries to remove these issues and makes tests more readable, fast, and reliable. Some of the points written below from Playwright Docs.
Playwright Features
- Multi-Browser and multi-language support.
- Playwright supports parallel tests with multiple browsers.
- Playwright comes with many built-in reporters like – Dot, List, Line, JSON, JUnit, and HTML Report. We can create custom reporters too. It also supports third-party reporters like Allure Report.
- Playwright provides many different debugging options making it developer-friendly.
- Playwright automatically waits for the commands
- Playwright saves the authentication state of the context and reuses it in all the tests.
Playwright Limitations
- Playwright is new, and it’s still evolving. Scope for improvement.
- Playwright doesn’t provide support for IE11.
- Playwright doesn’t support Mobile automation for native mobile apps.
Getting Started with Playwright Setup
Pre-Requisites:
Installing Playwright
Create a project folder in your favorite location, open the same folder in VS Code and run the following command in the terminal –
npm init playwright@latestIt will ask for some configuration options. Select the following after hitting the command –
- Do you want to use TypeScript or JavaScript? – JavaScript
- Where to put your end-to-end tests? – Leave as default (tests)
- Add a GitHub Actions workflow? (y/N) – Leave as default (false)
- Install Playwright browsers (can be done manually via ‘npx playwright install’)? (Y/n) – leave as default (true)
It will start to download the required packages for the project.
PS C:\Shubham\Blogs\Playwright\first-playwright-project> npm init playwright@latest
Getting started with writing end-to-end tests with Playwright:
Initializing project in '.'
√ Do you want to use TypeScript or JavaScript? · JavaScript
√ Where to put your end-to-end tests? · tests
√ Add a GitHub Actions workflow? (y/N) · false
√ Install Playwright browsers (can be done manually via 'npx playwright install')? (Y/n) · true
Initializing NPM project (npm init -y)…
After successful installation, You can see the project folder with many of the files and example code. You can see the following project structure –

Now, open the test JS file which is under the tests directory : example.spec.js. You can see the below sample test script.
// @ts-check
const { test, expect } = require('@playwright/test');

test('homepage has title and links to intro page', async ({ page }) => {
  await page.goto('https://playwright.dev/');
  await page.pause();

  // Expect a title "to contain" a substring.
  await expect(page).toHaveTitle(/Playwright/);

  // create a locator
  const getStarted = page.getByRole('link', { name: 'Get started' });

  // Expect an attribute "to be strictly equal" to the value.
  await expect(getStarted).toHaveAttribute('href', '/docs/intro');

  // Click the get started link.
  await getStarted.click();

  // Expects the URL to contain intro.
  await expect(page).toHaveURL(/.*intro/);
});
We’ll discuss all things in upcoming articles, In this, we are going to set up the playwright only.
Run the Playwright Test
By default, 3 workers will be used and tests will run on all 3 browsers – Chromium, Firefox, and WebKit, as they have mentioned in playwright.conf.js file. And also test will be executed in a headless mode which means the browsers will not open, and all the test cases will run in the background. After completion of the test, you can see the logs in the terminal.
You can follow the below command to run the example test –
npx playwright testAfter running the command, you can see the following terminal log –
PS C:\Shubham\Blogs\Playwright\first-playwright-project> npx playwright test

Running 3 tests using 3 workers

  3 passed (8s)

To open last HTML report run:

  npx playwright show-report
There are multiple commands to run the playwright tests for the specific scenarios.
Run all the tests
npx playwright testRun a single test file
npx playwright test example.spec.jsRun a set of test files
npx playwright test tests/dir_1 tests/dir_2Run test in Headed mode
npx playwright test --headedRun the test in a specific Project (Browser)
npx playwright test --project=firefoxRun the test with the Title
npx playwright test -g "Your Test Title"Run all the files that have file1 and file2 in the file name
npx playwright test file1 file2Disable Parallel Execution
npx playwright test --workers=1Debug the Playwright Test
Since Playwright uses Node.js, you can debug the code by using your console.log or by using IDE or by using VS code extensions. Playwright comes with the Playwright Inspector that allows us to step by step debugging facility, and you can also locate the web elements using this inspector.
You can follow the below commands to debug the playwright tests –
Debug all the tests
npx playwright test --debugDebug a single test file
npx playwright test example.spec.js --debugDisplay default HTML Test Report
Playwright provides a default HTML report that allows you to display the report and you can perform filter the report by browsers, passed tests, failed tests, and skipped tests. By default, the HTML report opens automatically if some of the tests failed.
You can follow the below command to show the HTML report –
npx playwright show-report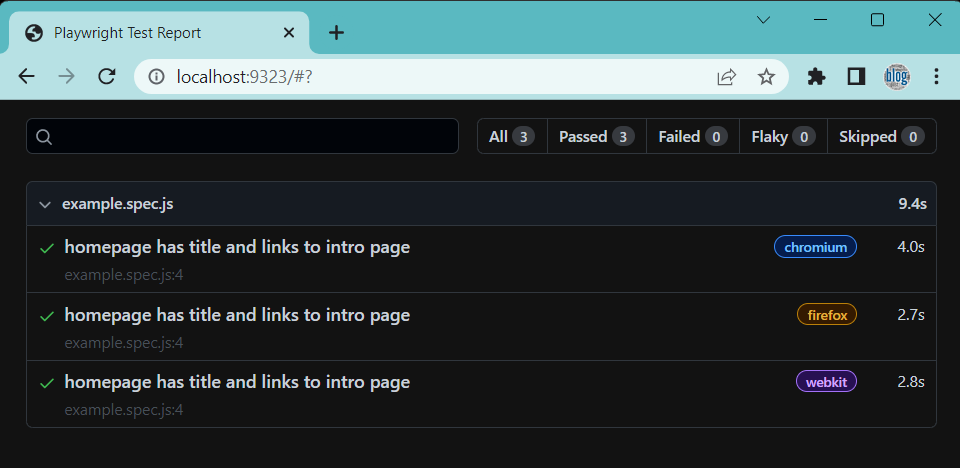
Conclusion
The playwright is an amazing framework and a node.js library that is built to test highly reactive modern web applications which makes the tests faster, more capable, and reliable. It has a large active community that is updating all the things regularly. In this article, we have seen how to set up the playwright framework from scratch and also seen how to run and debug in different ways. In the next article, we will create a new test case from the very scratch. It was a great experience to explore this tool and Happy learning!
Resources
You might Like
💖 If you like this article please make sure to Like, Comment, and Share it with your friends and colleagues.
Follow us on our social networks –