Till now, we have created a sample maven project using the maven archetype generate command and using IntelliJ. Now In this article, we will see how to create the sample maven project using Eclipse IDE. Basically, IDE (Integrated Development Environment) is software for building applications that combines common developer tools into a single GUI. We will see the complete step-by-step process to set up a maven project in Eclipse.
Table of Contents
Prerequisite
- Maven Installed and Setup the environment variables (See Part 1 for complete Setup.
- IDE Installed – Eclipse.
✅ Maven Introduction: A Complete Guide To Maven Introduction – Part 1
✅ Create Maven Project using cmd: A Complete Guide To Maven Introduction – Part 2
✅ Create Maven Project using IntelliJ: Maven Example using IntelliJ – Part 3
Create Project using Eclipse
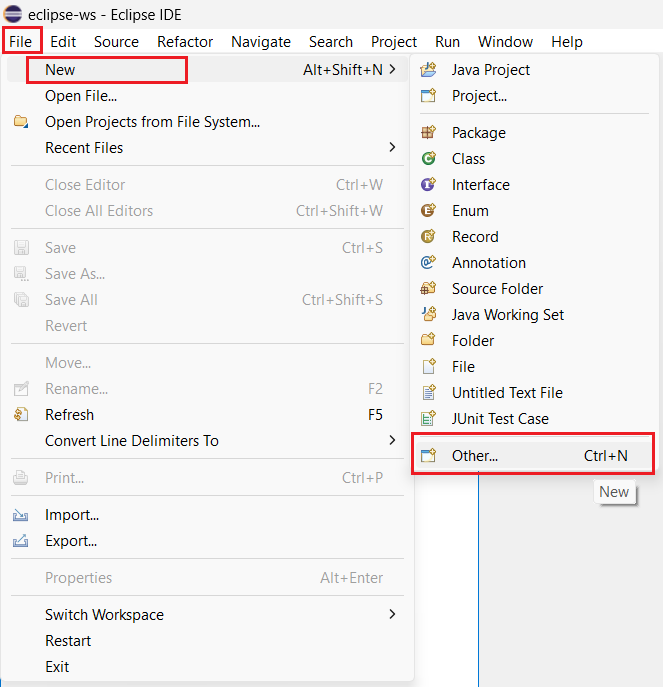
Step 1 – Open Eclipse and Navigate to File and then New -> Other
For creating the new project, first, navigate to the File option and then New, and after that select Other from the navigation window.
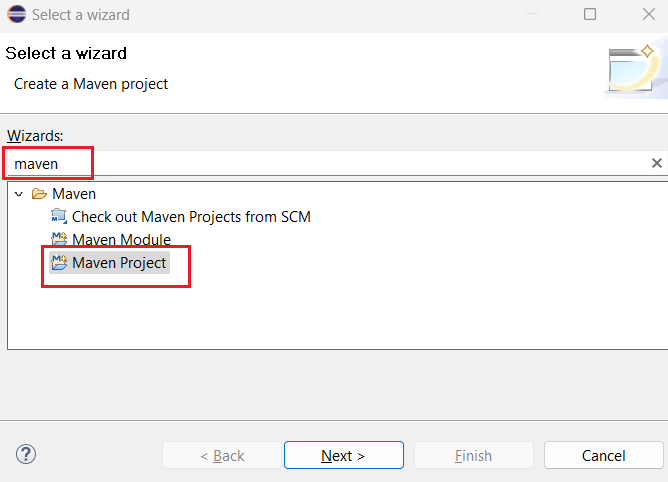
Step 2 – Select Maven Project
Now, Type the wizard name as Maven and then select Maven Project, and press the Next button.
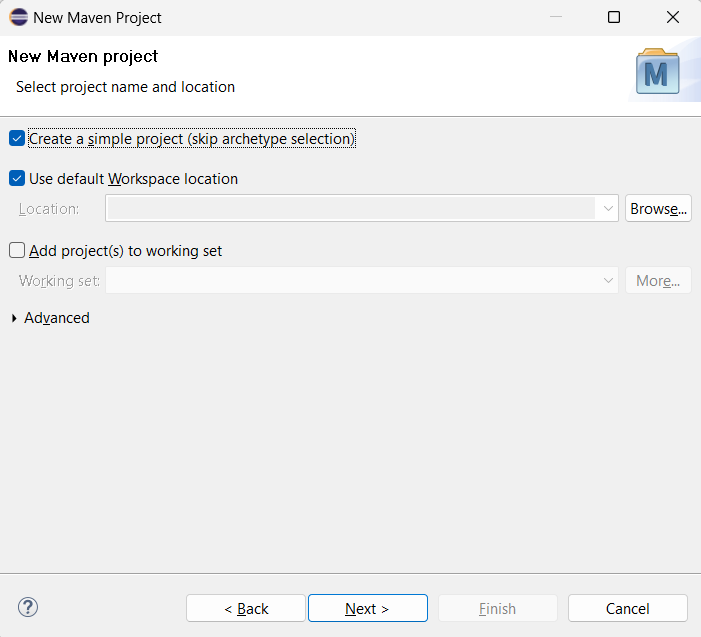
Step 3 – Select a simple project type
Next, Select a simple project type and click on the Next button.
Step 4 – Enter the project details
Now, a window will open and you need to provide the project details like – GroupId, ArtifactId, Version, Packaging Type, Project Name, and Description. Just enter the GroupId, ArtifactId, and project name and other details will remain as default or blank, they are perfect for now.
- GroupId – com.example
- ArtifactId – maven-eclipse-demo
- Version – default (0.0.1-SNAPSHOT)
- Packaging – default (jar)
- Name – blank (or as preferred)
- Description – blank (or as preferred)
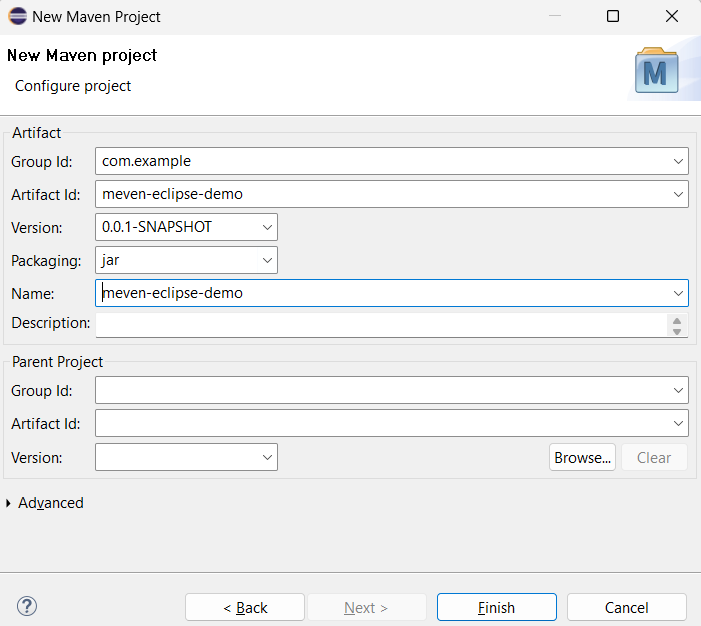
After providing the details, click on the Finish button.
Step 5 – After creating, you can see the opened project in your Eclipse.
It might take some time to generate the project, and after finishing, you can see the project structure as given below –
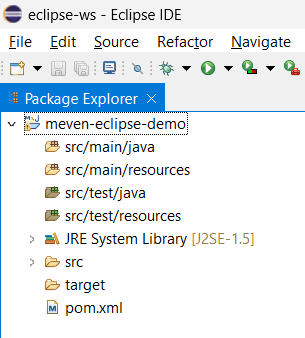
As you can see, there are four source folders src/main/java, src/main/resources, src/test/java, src/test/resources. All the development-side code comes inside the main folder and all the testing-related code comes inside the test folder. The resources folder contains the resource files like properties, JSON, or XML files that are used for data.
Step 6 – Add dependencies or plugins in pom.xml file
Now open the pom.xml file and you can add the required dependencies under the <dependencies> </dependencies> tag. Maven project creates pom.xml automatically that you can see below –
<project xmlns="http://maven.apache.org/POM/4.0.0" xmlns:xsi="http://www.w3.org/2001/XMLSchema-instance" xsi:schemaLocation="http://maven.apache.org/POM/4.0.0 https://maven.apache.org/xsd/maven-4.0.0.xsd">
<modelVersion>4.0.0</modelVersion>
<groupId>com.example</groupId>
<artifactId>meven-eclipse-demo</artifactId>
<version>0.0.1-SNAPSHOT</version>
<name>meven-eclipse-demo</name>
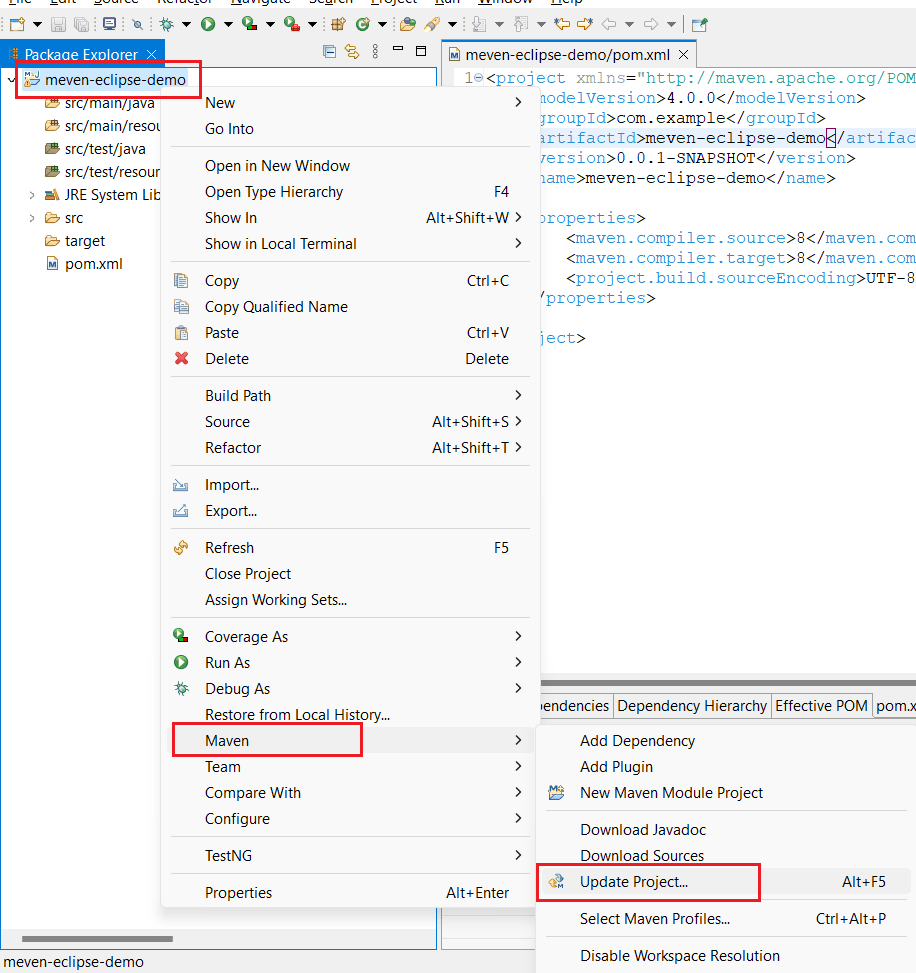
</project>By default, maven provides JRE 1.5 version. To change this into 1.8 we need to add properties in pom.xml file after <name> tag, and update the maven project –
<properties>
	<maven.compiler.source>8</maven.compiler.source>
	<maven.compiler.target>8</maven.compiler.target>
	<project.build.sourceEncoding>UTF-8</project.build.sourceEncoding>
</properties>
Now, right-click on the project and select maven, and then select update project (shortcut – Alt+F5), and select OK.
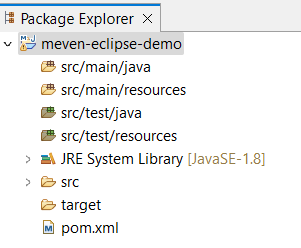
Now you can see the project structure has a JRE System library with 1.8 version.
Create Java Class
Navigate inside the src/main/java creating a package and inside this, create the Java class.
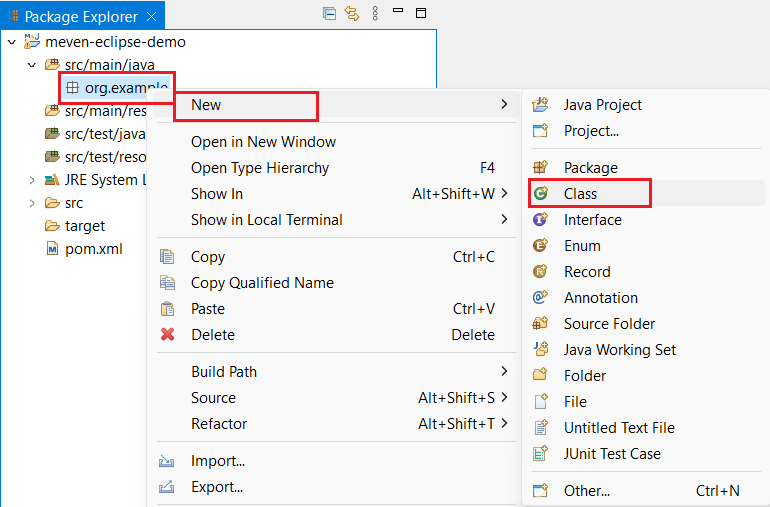
Step 1 – Create Package
Navigate to src/main/java and right-click on the java folder, select New and then package. I will name this package org.example

Step 2 – Create a java class inside the package
Right-click on the package name and select New and then Java Class. I will name this java class HelloWorld
Step 3 – Write the sample code inside Java Class
Now write the sample basic java code that will print the Hello World on the console.
package org.example;
public class HelloWorld {
public static void main(String[] args) {
System.out.println("Hello World!");
}
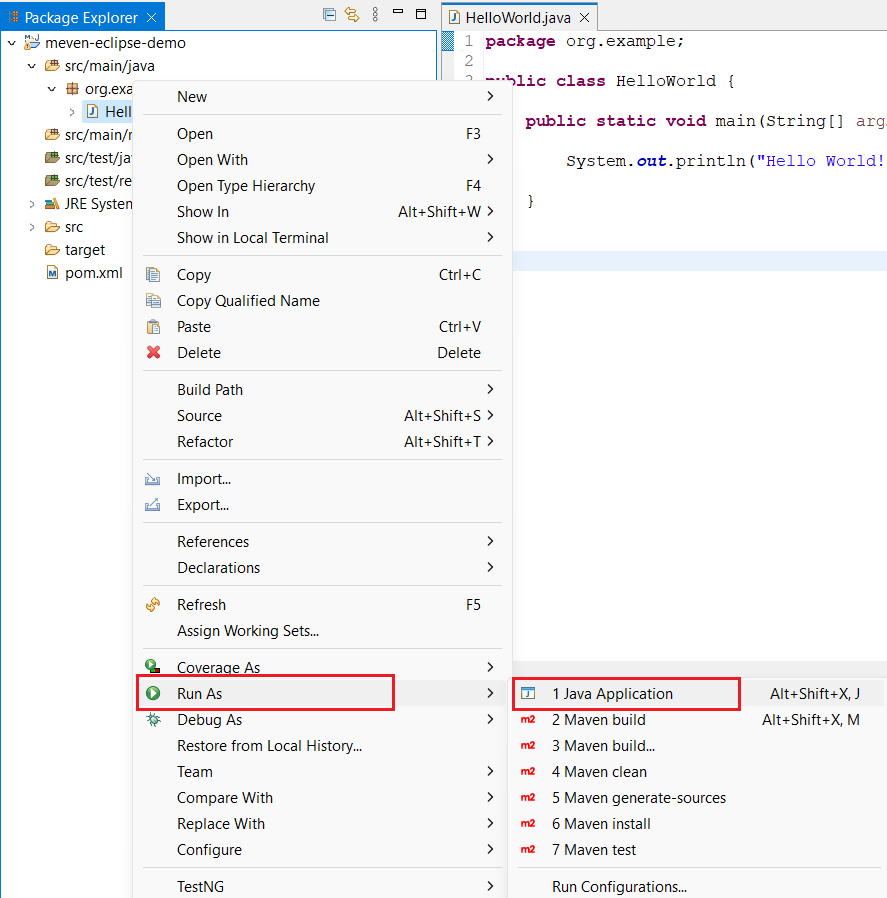
}Run the Program using Java File
Right-click on the Java file and select Run as > Java Application. It will start executing your java code and print the output in the console.
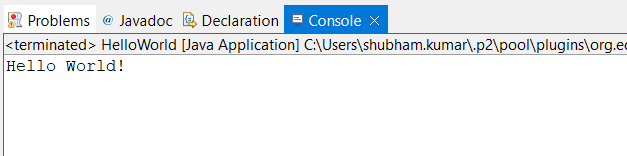
Console Output
Run the maven project using the maven lifecycle
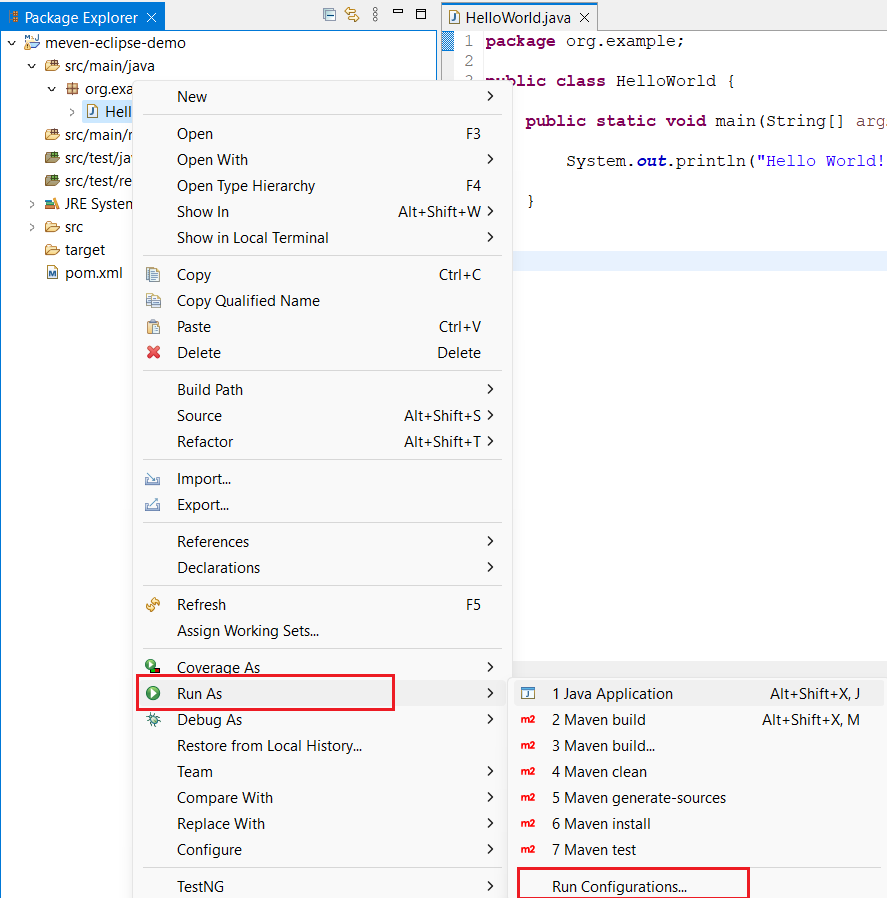
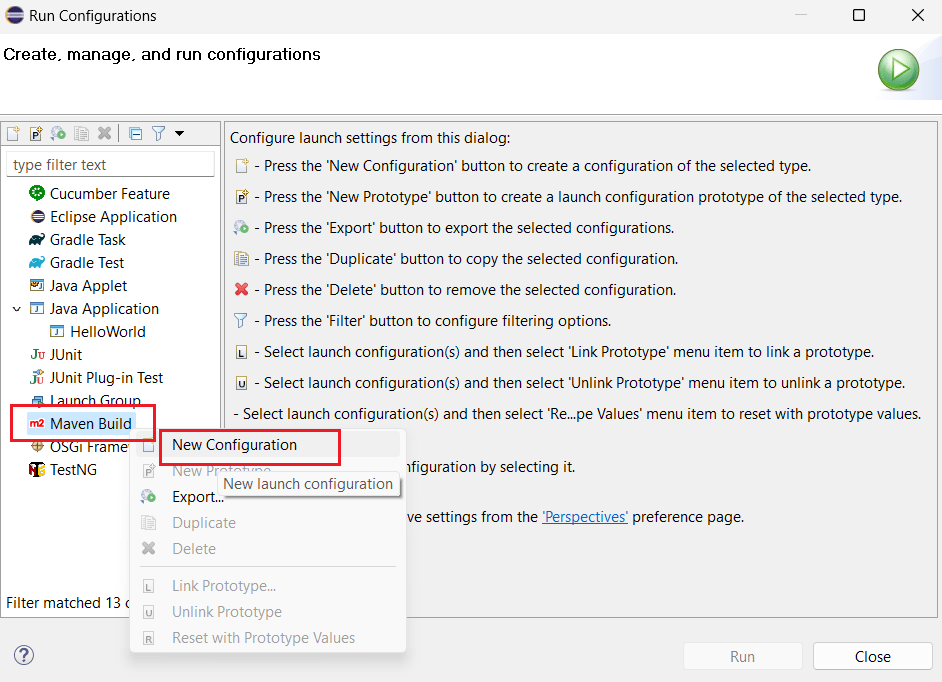
Step 1 – Right click on the class file and select Run Configuration
Right-click on the Java file and select Run as > Run Configuration.
Step 2 – Create a new maven build configuration
Select Maven Build and create a new configuration using right-click on it.
Step 3 – Provide the base directory and provide the goal
Select workspace and select project base directory.
Provide the maven goals as clean package
After that click on the Run button.

After clicking the Run button, you can see the console with the build status.
[INFO] Scanning for projects...
[INFO]
[INFO] -------------------< com.example:meven-eclipse-demo >-------------------
[INFO] Building meven-eclipse-demo 0.0.1-SNAPSHOT
[INFO] --------------------------------[ jar ]---------------------------------
[INFO]
[INFO] --- maven-clean-plugin:2.5:clean (default-clean) @ meven-eclipse-demo ---
[INFO] Deleting C:\Shubham\Blogs\Maven\eclipse-ws\meven-eclipse-demo\target
[INFO]
[INFO] --- maven-resources-plugin:2.6:resources (default-resources) @ meven-eclipse-demo ---
[INFO] Using 'UTF-8' encoding to copy filtered resources.
[INFO] Copying 0 resource
[INFO]
[INFO] --- maven-compiler-plugin:3.1:compile (default-compile) @ meven-eclipse-demo ---
[INFO] Changes detected - recompiling the module!
[INFO] Compiling 1 source file to C:\Shubham\Blogs\Maven\eclipse-ws\meven-eclipse-demo\target\classes
[INFO]
[INFO] --- maven-resources-plugin:2.6:testResources (default-testResources) @ meven-eclipse-demo ---
[INFO] Using 'UTF-8' encoding to copy filtered resources.
[INFO] Copying 0 resource
[INFO]
[INFO] --- maven-compiler-plugin:3.1:testCompile (default-testCompile) @ meven-eclipse-demo ---
[INFO] Nothing to compile - all classes are up to date
[INFO]
[INFO] --- maven-surefire-plugin:2.12.4:test (default-test) @ meven-eclipse-demo ---
[INFO]
[INFO] --- maven-jar-plugin:2.4:jar (default-jar) @ meven-eclipse-demo ---
[INFO] Building jar: C:\Shubham\Blogs\Maven\eclipse-ws\meven-eclipse-demo\target\meven-eclipse-demo-0.0.1-SNAPSHOT.jar
[INFO] ------------------------------------------------------------------------
[INFO] BUILD SUCCESS
[INFO] ------------------------------------------------------------------------
[INFO] Total time:  1.744 s
[INFO] Finished at: 2022-12-27T09:25:23+05:30
[INFO] ------------------------------------------------------------------------
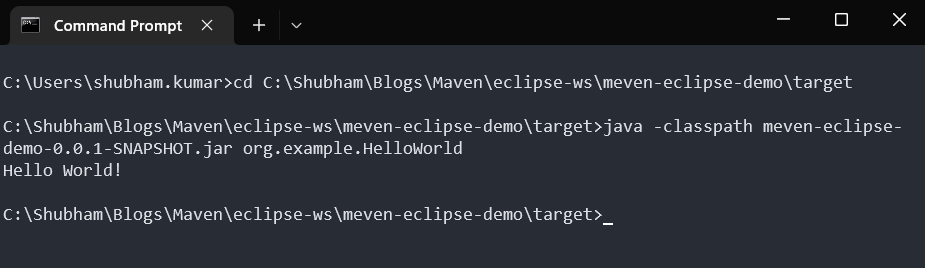
Step 4 – Find the JAR file
After success, you can see the target directory with compiled class files and a JAR file. If you are not able to see then right-click on the project and refresh it (Shortcut – F5).
Now, open the system default command prompt and navigate to the target location, and execute the following command to run the JAR file –
java -classpath maven-eclipse-demo-0.0.1-SNAPSHOT.jar org.example.HelloWorldConsole Output
Conclusion
In this article, we have learned how to create a maven project using eclipse IDE and run through the maven build lifecycle. I am hoping that this article is good for all who else is a beginner for the maven or Eclipse IDE. Till now, we have seen all possible examples to create a sample maven project using different ways. Now, we are good to end the maven article. I will come back with a new interesting article.
If you have any issues or doubts, feel free to connect with us. We will be happy to see you there.
Resources
If you like this article please make sure to Like, Comment, and Share it with your friends and colleagues
Follow us on our social networks –